Fairway Bunker Shots

Tips and instruction to learn proper fairway bunker shot technique.

By Kevin Cotter, PGA

The primary difference between a fairway bunker shot and a green side bunker shot is you strike the ball first then the sand in a fairway bunker.  The angle of attack to the ball is also more shallow than that of a green side bunker, in a fairway bunker the clubhead travels somewhat level to the ground through impact.

Also, position the ball more towards the middle of your stance.

Plan on up to a 1/3 distance loss with fairway bunker shots, therefore you may have to take some extra club, but do make sure you still have enough loft to to clear the lip of the bunker.

Check out the video link below with PGA Professional Michael Breed demonstrating a key tip on how to position the right foot in the sand in an effort to stabilize the back leg during the swing minimizing lower body movement. You must emphasize movement of the upper body with fairway bunker shots and keep the lower body fairly quiet.  This helps prevent your feet from pivoting/shifting in the sand during the swing.

Fairway Bunker Shots | PGA.com

PGA Professional Michael Breed hits Hazeltine National Golf Club to give you some helpful tips on the best ways to get out of those dre…
Below, Phil Micklelson describes the shallow attack angle and how he casts the club (breaks the wrists early in the downswing) to create a more shallow angle:


Happy golfing!

Spirit of Golf

spirit of golf thought of the day

April 28, 2013

Most do not understand that true power comes from releasing internal resistance rather than from pursuing, chasing, toil, and grind. We become conditioned to believe that we have to effort hard in order to achieve everything we want; in effect, we must struggle to deserve our success. In truth, we could relax and chill our way into receiving anything we want and desire, unless we don’t believe this to be true. Our belief about how easily results will unfold is ultimately what makes them appear. It is we and we alone who get to decide how much joy or misery is going to be involved along the way.

Orlando, FL – April, 2013 

 Irish Links Trip

Upcoming events

Join us in the following cities for upcoming Spirit of Golf workshops and clinics. For a full listing of our upcoming events, including our webinars and player/instructor certification programs, click here.

Master Your Swing: Simple Tips to Quickly Fix Your Slice

By Kevin Cotter, PGA

Slicing the golf ball is often caused by delivering the clubface to the ball in an open position at impact (for right-handed players, the clubface points right of the target). The good news is that fixing a slice is easier than you think! Here are the most common causes of a slice and simple cures to help you straighten out your shots:

  1. Grip Position

Your grip is the first area to examine when dealing with a slice. If your hands are rotated too far to the left (for right-handed players), the clubface will likely be open at impact, causing the ball to slice. Ensure your left hand is in a “strong” position—where you can see two to three knuckles when looking down at address. This adjustment can have an immediate positive impact on your ball flight.

  1. Wrist Position at the Top of the Swing

Next, closely examine the position of your left wrist at the top of your backswing. If your left wrist is cupped (bending inward), the clubface will likely be open, and if you return to impact in this position, it will result in a slice. Keep your left wrist flat at the top of your swing, which helps square the clubface at impact.

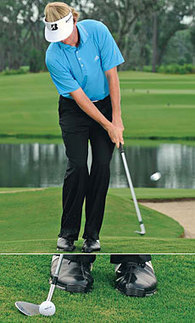
  1. Forearm Rotation (Pronation)

Another critical factor is your forearm and hand rotation through impact. Suppose your right hand pushes against or overpowers the left hand through impact (see image below of right hand working underneath and breaking down left wrist) rather than allowing the hands and forearms to rotate correctly. In that case, the clubface will remain open, causing a slice. Instead, focus on naturally pronating (rolling) your hands and forearms through the ball to help square the clubface.

  1. Swing Path

An out-to-in swing path is one of the primary causes of a slice. When your swing cuts across the ball from outside the target line, it creates sidespin, sending the ball curving to the right. Focus on swinging from the inside, then down the line.

  1. Alignment and Stance

Incorrect alignment can also lead to a slice. If you’re aiming too far left, you may unknowingly encourage an out-to-in swing path. Check your stance and ensure your feet, hips, and shoulders are all aligned parallel to the target line. A proper setup gives you the best chance to swing along the right path.

A few simple adjustments can drastically reduce or eliminate your slice, leading to more consistent shots and a more enjoyable round of golf. Try out these fixes and watch your game improve!

Greenside Bunker Tips

  1. Improve your greenside bunker play with some great practice tips!

    By Kevin Cotter, PGA

    By far, the most important aspect to successful greenside bunker play is striking the sand an inch or two behind the ball.  As another PGA Professional recommends as a sort of visual is to “Imagine the golf ball lying on top of a dollar bill and you’re scooping the entire bill and ball up together.”The video below from Alan Wronowski PGA Director of Golf demonstrates a great practice technique by drawing a line in the sand to practice striking a specific spot.

  2. Below “Your Best Bunker Tips” from PGA.com offers some interesting comments from Facebook fans on greenside bunker play including some great tips as well, starting out with my favorite of course “Don’t hit it in the bunker to begin with.”

    Enjoy!

Practicing Your Golf Swing in Slow Motion

  1. Slow down when working on your swing for amazing results!

    Practicing your golf swing in slow motion is a concept I’ve always believed in and have religiously articulated throughout my teaching career, “If you can’t do it in slow motion, how could you ever do it in fast motion.”

    Now some have argued they are not one in the same in the sense that with a full speed swing the dynamics are different when considering the impetus generated through centripetal force.  I believe this is true but only to a certain degree as they are overall missing the point that the player first needs to understand the exact positions they need to achieve within the swing and repeat those motions slowly over and over again and habituate them then slowly transgress over to full speed swing.

    Check out the Slow Mo Drill video below:

  2. Amazing, here is a video of Ben Hogan actually practicing in slow motion as referenced above by Brad Brewer.
  3. [youtube http://www.youtube.com/watch?v=h5vTfi0gtZ8?feature=oembed&w=400&h=225]
  4. Just for the sake of analysis here is a great slow motion swing video with Professional Golf Coach Mitchell Spearman examining the swing of the 2010 US Open Champion Graeme McDowell.

Executing the Perfect Pitch Shot

  1. This is a great tip to improve your pitching game.  The primary key to the shot is keeping the arms, shoulders and body moving somewhat in sync as described in this article by Krista Dunton PGA, by allowing the right elbow to fold against the right side during the back swing and left elbow to fold against the left side during the through swing.  Check out the article and video below for some great short game pointers.
  2. Todd Anderson on the Pitch Shot
  3. [youtube http://www.youtube.com/watch?v=WGA9HofE1Ek?feature=oembed&w=400&h=225]

Hitting the Ball Farther

  1. This is a great tip by Martin Hall PGA.  I provided an excerpt below from my recently posted article referencing the one-piece-takeaway and how it also helps establish the coiling affect described in this video. Combining the two thoughts will certainly go along way in “Hitting the Ball Farther.”

    “The “one piece takeaway” sets the timing of the swing into immediate sync. The desired sequence of movement is; clubhead, hands, shoulders, hips and lower body in that order. This backswing sequencing establishes proper coiling of the upper body against the lower body, providing a power generating spring like action to be unleashed during the downswing.”

    Article Source: http://EzineArticles.com/7488903

Of course better physical condition can also help you hit the ball farther, check out these drills from PGA.com to help build the muscles you need to hit the ball farther! 

The Golf Grip: Your Essential Foundation for a Consistent Swing

By Kevin Cotter, PGA
The grip is the crucial link between your body and the golf club — the point where feel, control, and power all begin. Arnold Palmer captured it perfectly:

“The grip is the crucial junction point from which all the body’s strength and rhythm are transferred to the club.”

A sound grip is not just a fundamental—it’s the foundation of every consistent, repeatable golf swing.


The Three Primary Golf Grips

Golfers generally use one of three classic grip styles. Each has unique benefits, and understanding them helps you select the grip that best suits your hands, mechanics, and comfort.


1. The Overlapping Grip (Vardon Grip)

The most widely used grip in golf, named after legendary champion Harry Vardon.

How it works:

  • The right pinky rests on top of the gap between the left index and middle fingers.
  • This softly “connects” the hands into one unified unit.

Benefits:

  • Encourages a natural release of the club.
  • Promotes hand unity without tension.
  • Ideal for players with medium or larger hands.

This grip is the preferred choice for most advanced golfers because it blends control with fluidity.


2. The Interlocking Grip

A favorite among players wanting an even more secure hand connection. Used famously by Jack Nicklaus and Tiger Woods.

How it works:

  • The right pinky hooks around the left index finger, interlocking them together.

Benefits:

  • Creates a very strong, unified hand structure.
  • Prevents the dominant hand from overpowering the swing.
  • Great for players with smaller hands or those seeking tighter control.

If your hands tend to separate during the swing, this grip can be a game-changer.


3. The Ten-Finger Grip (Baseball Grip)

Less common among seasoned golfers, but incredibly useful for beginners and players with limited strength.

How it works:

  • All ten fingers remain in contact with the club, similar to holding a baseball bat.

Benefits:

  • Easy to learn and very comfortable.
  • Provides leverage for players who need extra strength.
  • Ideal for juniors, newcomers, or players overcoming physical limitations.

While it may lack some refined control, it is an excellent stepping-stone grip for developing players.


Choosing the Right Grip for Your Game

There is no single “correct” grip — just the one that fits your hands, preferences, and golf goals.

Ask yourself:

  • Which grip feels most natural?
  • Do my hands stay connected throughout the swing?
  • Am I gaining control without adding tension?

Mastering your grip is one of the fastest ways to improve ball striking, create consistency, and unlock your natural swing motion.

Releasing the Clubhead

This story is for you if…
• You want more distance and accuracy
• You often miss your target to the right
• You don’t understand what “release” means
Photo By J. D. Cuban/Golf Digest

BY ERIKA LARKIN

It’s no big mystery why you’re slicing your driver. The clubface is open to your swing path at impact. And that slice can get worse if you pull in your arms on the downswing to try to steer the ball into the fairway. Here’s my easy fix: Remember to roll and reach as you swing through. Let your forearms roll over to square the clubface and then reach your arms toward the target.

You can get a feel for this full release by hitting some “bunt” shots with your driver. Tee up a ball and take your driver back until the shaft is parallel to the ground and the toe of the club points straight up (see photo). From there, focus on extending the shaft toward the target so it mirrors that halfway-back position, with the toe up again. Bunt some balls down the range, and don’t worry about distance.

 The Standard Advice

Try to square the clubface at impact for straighter and more accurate shots.

Why it’s Misleading

Impact lasts only a few milliseconds, so trying to perfect that moment is nearly impossible.

The Tip You Really Need

A solid release guarantees proper clubface rotation through impact, so perfect it instead. Plus, it’s easier to control your release. As you drive through the hitting zone, give the ball a slap with your right hand, changing your right wrist from bent back to bowed. Check the positions at left to see what it looks like.

 Elbow In

Your left elbow should hang tight against your torso as your hands release. You can’t unhinge your wrists if your left arm bows out (no chicken-winging).

 Shoulder Under

Your right shoulder moves under your chin, not in front of it. This allows your hands to power the clubhead correctly through impact and then around your body.

 KEY MOVE – Active Wrists

Prior to impact your right wrist was bent. Now it should be bowed. This doesn’t happen by itself—”slap” the ball with your right hand to release the club properly.

 Club on Line

A proper release whips the clubhead around your body in a circular motion and into your finish.


My Favorite Shots To Save Par

See on Scoop.itgolf instruction

Brandt Snedeker shares his favorite shots around the green. (RT @GolfDigestMag: One of Brandt Snedeker’s favorite shots around the green? The hands-free lob.

BestGolfeBooks‘s insight:

The "Hands free lob" is an adaptation to the pitching swing and is a great tool in and around the green.  The firmness in the hands provides a high degree of consistency.

See on www.golfdigest.com